How to bring Lottie to SwiftUI
What is Lottie
Lottie is a animations framework by Airbnb where you can place JSON files in a specific format to be animated.
Isn’t Lottie available for SwiftUI?
No Lottie is a UIKit framework, however in this tutorial we will create a wrapper around the UIKit framework so we can use it in SwiftUI. We will be using UIViewRepresentable which is a SwiftUI View that allows us to wrap UIKit views in a SwiftUI view.
Step 1: Disable Dead Code Stripping
Disabling dead code stripping means that code that isn’t compatible with SwiftUI will be compiled. If we do not disable dead code stripping our application will crash when the Lottie animations are played.
Step 2: Create a new Swift file
In this new file create a UIViewRepresentable struct called LottieView
Step 3: prepare the LottieView for coding.
First we need to click the the error Xcode keeps yelling about. Click Fix. This will add protocol stubs. A type alias where we specify what type of view we want. We will be using UIView as our type alias.
As you can see we now have a type alias with UIView as its assigned view. Xcode still keeps yelling about more protocol stubs. Click fix, and you will get two new functions.
Step 4: Adjusting the template
We need to make the following changes, In the makeUIView function we will replace Context with UIViewRepresentableContext<LottieView>
Step 5: Now we fill the template with Lottie code.
First we need a State variable which will serve as a way for us to specify which JSON animation to play.
In our makeUIView we will create a parent view which will hold the animationView. Since makeUIView returns a type UIView we need to return our view variable. Make sure to leave a space between the view variable, and the return statement as we will write code between these two lines.
Let’s bring in our animationView with all of the settings we need.
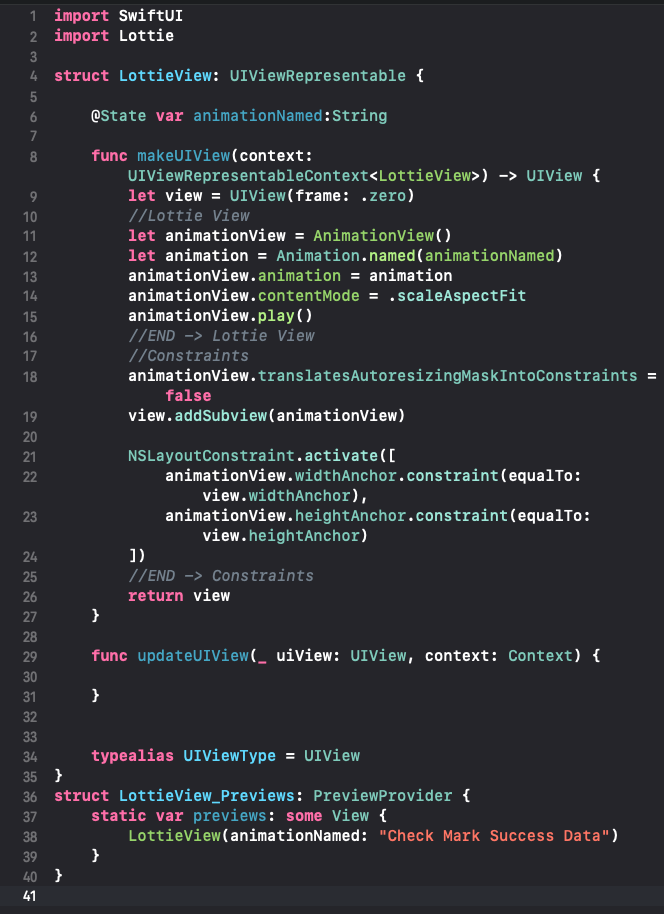
In this code we create our AnimationView, and set our animation.named to our state variable animationNamed so that we can specify the name of the animation in SwiftUI. Then we set the scale factor to scaleAspectFit which ensures that the animation will fit the screen properly. Then we play the animation. You can expose more sides of the framework, but we will leave that for a more advanced tutorial in the future. Now we will set the constraints to set the animation view to the same size as the parent view thus making the animation take up the entire parent view.
In the constraints code we also added the animation view to the parent view which means we are done.
Step 6: Create a playable preview
Now let’s create a preview window so we can run the view and see our animation in action.
In my case I am playing an animation called “Check Mark Success Data“ you do not need to add the .JSON at the end. Now on the preview window you can hit play and watch your animation come to life.
That’s it. Below is how our full LottieView file should look like.


